
As standard, we use phthalate-free black, yellow, red and fluorescent green material. All ingredients are individually FDA approved.
The dip moulding process only has a few steps, but each one is performed with meticulous precision. To explain this further, we made a step by step description of dip moulding.
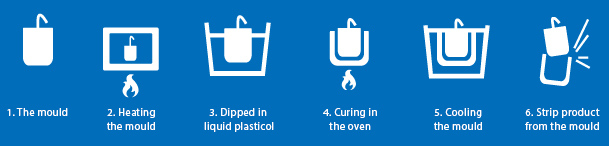
Below, we explained the dip moulding process step by step.
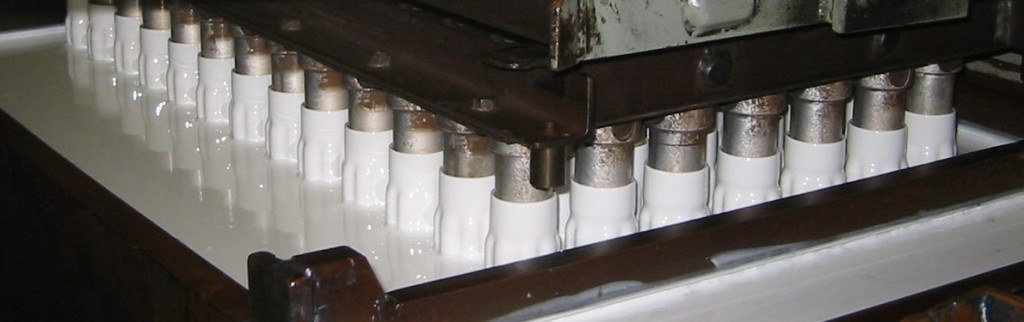
The tool(s), also called moulds, are mounted on a special frame or plate.
The tool is preheated in an oven until it has reached a specified temperature. The combination of temperature and dip time determines the eventual wall thickness.
After preheating, we transport the mould to the dip tank. We determine the dipping speed by, among other things, the shape of the mould and its length. Sometimes, the dipping speed must be varied during dipping to produce a product that is as uniform as possible.
The dipping process stops at a point determined in advance. The wall thickness increases as time advances. This can vary from several seconds to up to 2 minutes. Afterwards, the mould is removed from the vinyl/ plastisol at a specified speed. The dip frame is then automatically transported to another oven in which the product cures completely.
After curing, the complete dip frame including dip moulded products is cooled in water to allow the products to be removed from the moulds. It is not desirable to cool the product completely because the “residual heat” it contains makes it easier to release if from the mould. For complex shapes like bellows, this is of course very important.
The dip moulded products are released from the moulds manually or using compressed air. The use of an FDA approved releasing agent speeds up this process.
The description above gives a basic overview of the dip moulding process. We can of course also choose to double dip a product (multiple colours in one product). Finishing treatments include cutting, punching and printing. Also, we can arrange special packaging.
The process is ideal for small to medium-size batches with a small number of moulds, but large volumes can also be efficiently produced using this technique (consider dip moulded caps for the automotive industry). The main advantage is that the mould is only a fraction of the cost compared to the tooling costs of other production methods, even for the production of large volumes.
